Wednesday, October 31, 2012

Making Pre-Heresy 'T' pattern helmets


You know those 'T' helmets you commonly see on the Chaos Space marine sprues? Well I thought it would be cool to have them on my Blood Angels.

Here's how you do it:


1. Cut off the side bits on a normal Space Marine helmet. 


2. Small ball of putty on his mouth. 


3. Flatten out the sides so that you get a distinct raised area in the center. 

Sunday, October 28, 2012

Weekly Snapshot: Paperhammering a Leman Russ Part 3


This week, I went back and cleaned up the basecoats. The camo I had last week was the first camo job I ever did on a tank, so it did not look pretty. I made it a little more interesting by adding variations into the pattern, instead of just vertical stripes.

It's not looking great so far, but it's not looking bad. Hopefully, the finished paintjob will make this Leman Russ look like a real 40K model, instead of just a cheap cardboard imitation.

Wednesday, October 24, 2012

Review: Let the Dice Decide (webstore)


About a week ago, I received a package from Let the Dice Decide, a miniature bits seller based in the UK. Their website is at: http://www.letthedicedecide.co.uk/

I ordered some bits for my scratchbuilt Leman Russes and for my upcoming Imperial Guard force. They dispatched my order the day after I had placed it. And arrived here in Australia, which is a good distance away from the UK, in about a week or so. Crazy, crazy fast. 


My package arrived in a nice padded envelope, with the bits placed nicely inside this plastic bag. Everything was in excellent form, and everything I ordered was there. 

Besides the excellent service, they have some reasonable prices up on their website. I thought my order was reasonably priced as well. 


Excellent service, excellent prices and fast delivery. I highly recommend them, and look forward to purchasing some 40K sprues from their complete sprues section in future. 

Sunday, October 21, 2012

Weekly Snapshot: Paperhammering a Leman Russ Pt 2


If you missed the Weekly Snapshot two weeks back, here's the link. So I've finished the modelling and assembling which took a veeeeery long time. It ate up quite a bit of my hobby time and effort, but I think it was worth it in the end.

The only money I spent on this Leman Russ is the demolisher cannon and the heavy flamer. I decided it was too hard to do the weapons so I bought them off Let the Dice Decide, which arrived stupidly fast.

It does look feth ugly at this stage, because I was rushing to put on the base coats for upload. Hopefully, it will turn out nicely and integrate well with a Steel Legion force I'm coming up with.

Wednesday, October 17, 2012

Sculpting your own urban pavement bases


Here is how you sculpt your own urban pavement bases for Warhammer 40K, WFB, etc. It's a tutorial that can be universally across all game systems.

The idea is to create an urban environment that has been heavily destroyed by war and/or natural forces. It's quite a simple tutorial that involves simple sculpting skills.

Sunday, October 14, 2012

Weekly Snapshot: Imma step on my shield!

It's been a bit of a slow week. The scratchbuilt Leman Russ is on hold as I await the arrival of some turret weapons I ordered over the internet. Darn cardboard just doesn't work well when trying to make cylinders.

I had a Vanguard Veteran that was lying around for quite some time and decided to give him a base. You can't really see it from this angle, but he's stepping on a combat shield from the Space Marines Assault Squad box that I had lying around. I made some scratches and bullet holes into the shield to give it an abandoned and war torn feel.
Really sorry about the lack of photos guys, I cannot be bothered to set up my mini photography studio again.


I did some experiments on this guy with a new weathering technique. I just loaded my brush with silver paint and scratched away. I think the metal could do with some further work, it's quite bright in inappropriate places because of the light. Maybe a wash on the darkest parts?


Wednesday, October 10, 2012

Cutting Costs: The Primer


This is Part 4 of Cutting Costs.

We all know that enjoying our little hobby can be tough on our wallets. And your ears as your wife/husband/girlfriend/boyfriend/dog repeatedly complains about those "little men". 

Pretty much the first piece of  advice new wargamers hear is "Use a primer to create a workable surface on your miniatures before painting".

Let me tell you this: I've been in this hobby since 2008, which is by no means long, but I have never EVER used primer. That's right.

Although a can of primer will only cost you about $10 and is able to cover about 30-50 miniatures, it's still an expense, which means it can be eliminated.

I think the first painting tutorials GW provided in the Assault on Black Reach set really affected me. It was always undercoat with black (didn't mention prime), basecoat and then highlight. I have never run into issues where the paint won't stick to the surface of plastic properly.

If you've noticed, a lot of the photos (actually, pretty much all to my great shame) on this blog show a partly painted miniature, with some bits in their unpainted grey. I just skip the priming step and move onto the basecoat, saving me money and time.

Metal is an altogether different story. Thankfully, GW has moved away from metal to Finecast, but primer is needed for metal figs. The paint won't adhere to the surface like it will do with plastic without primer.

To sum up: you don't need primer for plastic models. Instead save it for metal models, which will save you money, seeing as how metal models are becoming less common (outside of GW, this statement is becoming more relevant as many miniature businesses are switching to plastic)

Sunday, October 7, 2012

Weekly Snapshot: Paperhammering a Leman Russ


I decided to start work on a Leman Russ for my new Imperial Guard force, which I'm waiting for to arrive. I've never really bought vehicles despite all the glory in 5th Edition, instead focusing on building up my infantry.

But vehicles are bloody expensive. Whereas you can get 10 infantry models for say $30, a tank costs $50 for one model.

So I decided to go the cheap, 'Paper hammer' way. As you can see, I built the beginnings of a Leman Russ with bits of cardboard cut out from a cereal box, and a template I got from the interwebs. It's fething tiring and my fingers are sore, but it helps me save some money.

Virtual Stranger at his blog: http://thegrimcheapness.blogspot.com.au does an amazing job with these. When painted up, it looks basically indistinguishable from a real 40K model.

Perhaps in a month's time, I'll be able to achieve this level of quality...Hopefully.

Thursday, October 4, 2012

Review: Vallejo Decal Fix + Medium with Tutorial


A couple of weeks ago, I received my order from Maelstrom Games. Vallejo's Decal Medium and Decal Fix.

I've always had a problem with my decals.


The surface would never be quite even and was always shiny. It was so obvious to a casual looker that I had applied a decal on my minis. There was even a stage where the decals I had applied previously simply slipped off.

What a waste of decals!

Decal Fix lets the decal apply securely to the mini, whilst Decal Medium gets rid of that uneven surface or sheen. At least that's what is supposed to happen.
On to the review/tutorial!:


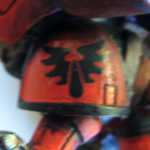
Cut your decal out of the sheet, making sure that stick close to the edges. With rounded surfaces like Space Marine shoulder pads, compensate for the uneven surface by cutting a 'V' as shown. 


This isn't mandatory, but it is recommended. Apply a thin coat of gloss varnish so that you'll get a nice smooth surface. Wait for it to dry!


Apply the Decal Fix onto the surface. Dunk the decal in water as usual (GW provides us with basic instructions on the back of their decal sheets). Slowly and carefully ease the decal off the sheet with the help of a brush, onto the surface of the mini. 


Once it's dried, apply a thin coat of Decal Medium. 

Once it's dried, it could be a little shiny but can be easily solved by a matte varnish, which you would do normally anyway. 

So what do I think? These are amazing! I'm really pleased by the way it's turned out. It looks like it's been painted on, which was exactly what I was aiming for. There's a tonne in each bottle which will last you a few armies probably. 

Great value, great results. 

Final verdict: 

I am definitely glad I made the purchase, and has reinforced my affection of Vallejo even more!